Showing posts with label green. Show all posts

Monday, 28 November 2016

Changing Blankets to make a better design

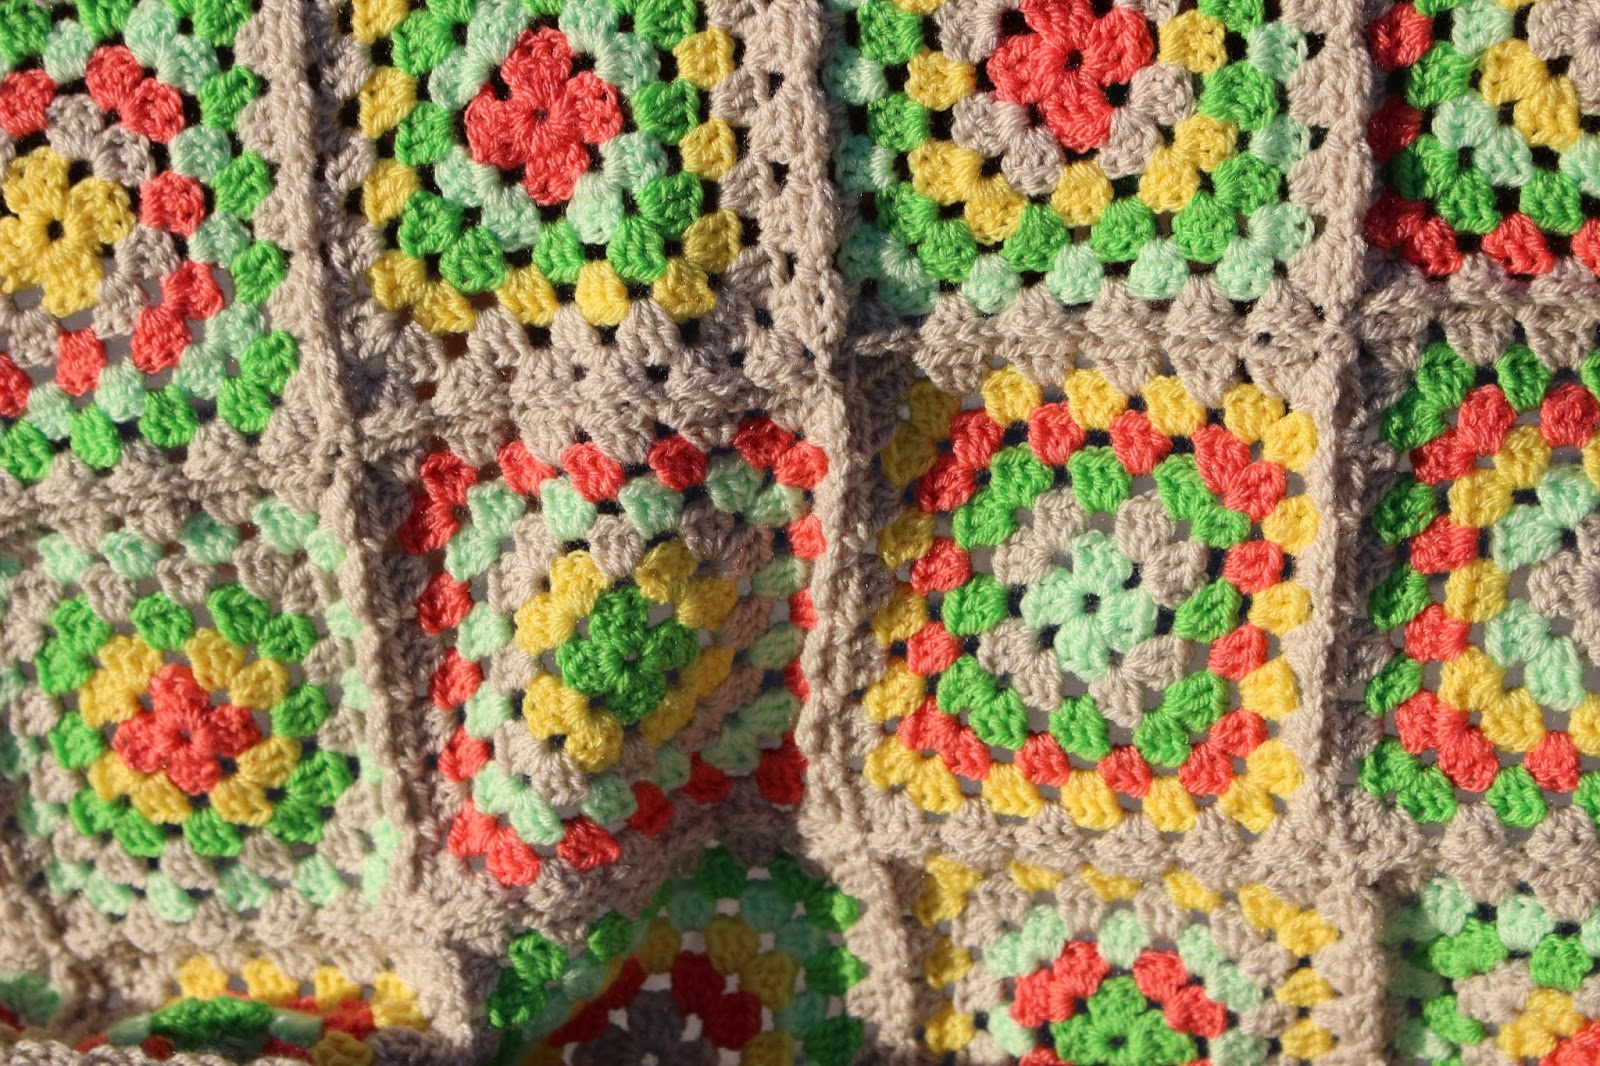
Back in May I posted about a baby blanket I had made.  Its been up for sale in my etsy shop since May and I haven't been able to sell it.  So I decided it needed to be changed to make it more appealing.  So I frogged all of the double crochet joining the granny squares.  I decided I would try the join as you go method from Attic 24.  This blanket is made from traditional granny squares and is made from Stylecraft Special DK wool in Grass Green, Spring Green, Citron, Shrimp and Parchment.  I had initially joined the squares together using Grass Green but for joining together I used Parchment.  It has made the blanket look really pretty.


As well as using the join as you go method and changing the joining colour to parchment I've also added some more squares to the blanket making it toddler/pushchair size of 30 x 40 inches.  So altogether the blanket is made up of 48 squares.  I've attempted to photograph it today as I've finished it and today was sunny.  My house was as grey and and dark as its been for many days now so I went to the park just 2 minutes around the corner from my house to take photos in the sunlight.  Whilst it was bright and sunny it was a tad blowy and so it was hard to get the blanket to keep still. 

I've still got some way to go to improve the photographs I take, I may have to sign up for one of the online photography courses run by Makelight to ensure I take much better photos.  I hope that with these changes my blanket is more appealing to the Etsy shopper.


Thursday, 24 November 2016

Crochet blanket for my Grandma

Last year I started on making a blanket for my Grandma.  I had been to visit my Grandma for a few days between Christmas and New Year and she talked about being cold and so needed the heating on.  My sister and I commented on the fact that she doesn't have blanket to wrap around her if she was cold.  So I started on a blanket for my Grandma.

My Grandmas favourite colour is burnt orange and the colour of her lounge was green.  I therefor set out to create a blanket in orange and green colour way.  I looked through pinterest to find inspiration for colours for the blanket so I explored pinterest and decided I liked the colour interests on this picture of poppies.  I ordered some Stylecraft Special DK in Meadow, Lime, Khaki, Spice, Jaffa and Black from Wool Warehouse.  I already knew I was going to make a ripple blanket using the ripple from Attic 24.  You can find the tutorial for how to do this here.  I decided I didn't like the black and so changed black to cream instead.


I started this blanket in the hope I would be able to give it my Grandma for her 90th Birthday, but I didn't get it finished in time for her birthday.  I then hoped to finish it in time for last Christmas but didn't quite manage to get it finished in time.  I did get it finished over the Christmas holidays.  Since I had bought the wool and finished the blanket my Grandma's health had deteriorated and she was living in a care home.  I gave my parents the blanket to give to her but they didn't give it to her as they were worried it would go missing in the home.  Unfortunately my Grandma never got to see the blanket whilst she was alive.  I couldn't cope with the though of someone else having this blanket other than my Grandma so it went into her coffin with her keeping her warm (it was February and a tad cold).  So whilst my Grandma never saw the finished blanket it did help to keep her warm.

I purchased 2 balls of each colour of stylecraft yarn for the blanket and only needed to use one ball of each colour and so had some spare yarn.  I then decided I would make another blanket in these colours.  It wasn't going to be a ripple, I was going to make my first corner to corner blanket.  So I looked up online how to make a C2C blanket and with help from a number of different sources including The Patchwork Heart and the Crochet Crowd I completed my first C2C blanket.  It was quick to make.


This is my corner to corner blanket, which is my first attempt.  It is Lapghan sized  and so is 36 inches by 48 inches.  Although it is the same colour way as my Grandma's blanket it looks quite different.  What do you think?  Is this a good colour scheme? Do you think it works as a C2C blanket?  I can't help but think it looks better as a neat ripple also the Jaffa colour is shinning out very brightly in the photos which it doesn't do in reality.

Sunday, 15 May 2016

Crochet Granny Squares Pram Blanket

At the start of this year I made a promise to myself that I would blog more.  Well I've certainly not kept this resolution this year.  I've not posted much at all.  This hasn't mean I've not been crafting or making anything to blog about, because I have.

For quite a while on my pinterest board I've been collecting and posting pins with lots of different colour combinations.  I've been posting and saving these pins to inspire me on colour choices for making crochet blankets, cushions and all the different items I like to make.  So in February I picked a pin and order wool from the Wool Warehouse (my favourite website to order from).  The yarn was Stylecraft special DK acrylic (my favourite yarn to use) in the shades of Grass Green, Spring Green, Shrimp, Parchment and Citron.  This is the link to the pin which was my inspiration.  The inspiration was ice lolly's and who doesn't like Ice Lollies.


I made this blanket in February and it was the second blanket I completed this year.  I wasn't making this blanket for anyone else in particular.  I wanted to attempt to make a pram blanket and to put it up for sale on my etsy blog.  I used the different colour combinations pinned on my pinterest account and chose this colour combination.  I liked the fact that it was unisex and that it didn't contain any blue or pink.


I do enjoy making standard granny squares and I like the traditional look of them, even though the colour combination isn't traditional.  I usually make each square separately first and then join together.  This time I made all the first rounds for all the squares I wanted, then I completed the second rows, etc.  I have to admit I didn't enjoy making the squares this way, I think I like the satisfaction of completing each square when I've finished them, rather than having lots of part made squares. But in the process of making a blanket quickly, this is the quickest way of making one.


This blanket is for sale in my Etsy Shop along with many other items which I have made.  What do you think of this pram blanket?  I've joined the squares together using double crochet as I've not mastered a joining technique which holds the squares together as well as double crochet.  I follow Little Dove Crochet on Facebook and Instagram and I do like her method of joining.  I am sure on my next squares blanket I will have to master this technique.


I've also tried to take different photos today of the blanket.  I initially took photos using my phone when I finished the blanket in February, but I didn't feel they showed the colour so well.  Today I went outside in the sunshine to take the photos in an attempt to get better representations of the colours in the blanket.

Thursday, 6 August 2015

Patchwork Table Runner

After making the goody, goody binding bag last week, I started on making a patchwork table runner for the dinning table.  I've have bought fabric to do this at the start of the year, but I hadn't made any attempts to make the runner.  I had a number of conversations with Kirsty about the table runner and I wasn't sure about the fabric I had initially bought and so, with any excuse to purchase more fabric, I did.

I purchased a bundle from Elephant in my handbag  of Lewis & Irene fox and friends fabric as it had the greens, browns and oranges which we have in the curtains in the dinning room.  

This is the completed table runner on the dinning table.  I cut 6 of the 7 fat quarters from the bundle into 2.5 inch strips.  For the first time I used the pinking blade on my olfa rotary cutter.  I stitched the strips into groups of 3 strips together.  I then cut these into 6.5 inch squares.  I alternated and turned the squares around to create this design.  The runner was then 3 squares wide and 12 squares long, a total of 36 squares.


This is a close up of the detail of the strips made into squares.  Once the runner top was pieced together I then added cotton wadding and green fabric to the back.  These came from Emporia Fabric and Craft in Ashford, Kent.  I then quilted lines 1 inch apart across the width of the runner to secure the sandwich together.  I used the stitching guide in the foot of my sewing maching to help with the accuracy of the lines.  I then edged the runner in orance fabric also from Emporia Fabric and Craft.  I've never been very good at binding and before I completed the binding on the runner I looked up some tutorials on YouTube about binding.  I found this video from Heirloom Crafts the easiest to understand and follow whilst making my runner.  The mitred corners are the best I've managed, but I still have to master the art of making them perfect.


My patchwork and quilting skills are improving and I would say that so far this is the best patchwork and quilting piece I've made.  Although my top stitching and lines are not completely straight I fell they are better than the first few quilts I made.  I only made my first quilt 10 months ago and attended my first patchwork class 9 months ago.  Whilst I still have some way to go to make my projects perfect they are improving with each one I make.

How long have you been sewing and crafting?  I started sewing when I was young and my Mum bought me my first proper sewing machine when I was 10 (I turn 39 on Sunday) and I still have it. I got a toy sewing machine (although it did actually work) when I was about 7) so I've been sewing a long time.  I mainly though made dolls, dolls clothes or clothes for myself.  I did some patchwork at primary school.  I started cross stitching when I was 12 and for a long time this was my main craft.  I do a whole variety of needlecraft and papercraft and this will be reflected in my blog posts.  What I make depends on my mood and most recently my mood has been sewing, hence a number of posts about sewing.  

What are you making?  Is it something big?  Is it for you or is it a commission?  I'd love to hear all about your crafty makes so leave a comment and tell us about yourself.


Sunday, 1 February 2015

New Sewing Machine.

I've not posted on here for a little while, my goals for this year was to blog more and just when I had ideas of things to make and blog posts to write, work (as always) got busy and I decided to decorate my bedroom.  All of which overflowed my stress bucket (for anyone whose completed their Mental Health First Aid Training will know what that is about) and my response for being too stressed is to go quiet and stop communicating.

So what has been going in the crafty world of Sarahdipity?  Well for started I made a rash decision to buy a new sewing machine.  I am now the proud owner of Pfaff Smarter 260c.  It arrived on the 14th January and looked lovely.


Here is a photo of my lovely new sewing machine sat on our dining room table.  It arrived on a Wednesday and I knew I had no time to try it out until the weekend.  So I looked at it, stroked and pushed buttons.

The weekend came, but I needed to move into action with the thoughts of decorating my bedroom.  I had no furniture was living in the spare room and a new bed had arrived.  I didn't want to put the new bed up until I had decorated the room.  So instead of playing on my new toy, my wonderful Pfaff computerized sewing machine with a top loading bobbing, one step button hole and many other features I was looking for, I was painting woodwork, wall and putting up wallpaper for the first time ever in my life.

I got round to trying out my sewing machine for the first time on Tuesday 20th January (almost a whole week later!!!!)  So in my hour of play I used some scrap fabrics and tried out the different stitches.  It didn't look good as I couldn't get the tension right, but after many, many attempts I finally got the tension right and the stitches started to look neat.  I tried out the one step button hole, tried out the button sewing foot I had purchased plus used the quarter inch foot to use some scraps of fabric to start making a simply crazy patchwork.

The sewing machine was silent, easy to use and so much nicer than our old, basic Singer sewing machine,  I'm sure this machine will work lovely after a service as we've owned it for 8 years and we've not had it serviced.  All in all everything with the machine was really lovely, apart from being able to set the tension correctly.

I didn't get a chance to do anymore sewing for another week as I was again busy with work and continuing with my bedroom makeover.  A week later I got back onto the sewing machine.  This time around I finished the simply crazy patchwork and turned it into a square and edged it ready to turn it into a cushion cover.  I also played around with the blind hem foot.  I've got two sets of curtains which need shortening, including lining.  I need to master blind hemming (I've never managed to do it before) so I can turn these curtains up and prevent all the heat from the radiators going up the curtains and not into the rooms.  Quick rant here - I moved into a new build house 8 years ago, now being new build you'd think it would have standard sized windows?!  Oh no, not one window in the house fits standard sized curtains.  Standard curtains are either not long enough or way too long.  Plus all the radiators were fixed under the non-standard sized windows meaning you have to shorten all the curtains to ensure you get all the heat coming from the radiator.  Why not fit standard size windows?!!!!!.

Anyhow the bedroom makeover involves having to shorten the new black out curtains for my bedroom and the curtains.  I also need to shorten the curtains I bought for the dinning room last Christmas too.  I have now mastered the art of blind hemming and so now feel ready to tackle the curtains.  I now need to spend a considerable chunk of time measuring, cutting, pinning and sewing to get them to the right height for the windows and radiators.

I did though by the end of last week finish my cushion cover I had started and here it is.


I made a similar cushion before Christmas which I had for sale in the pop up shop.  This one though has a white centre and white edges unlike the other one I made.  It also has a more distinct swirl pattern to the colours going around the edge.  Another bonus is that it matches the colour scheme in my newly painted bedroom (you can see a sneak peak of the wall paper in the background, my new bed frame and my bedding). This cushion won't be staying in my bedroom, it will go up for sale on Etsy.   I've bought a load of fat quarters to make cushions and other stuff for my bedroom.

What do you think of the cushion?  It took much longer to finish that I expected, but making over a bedroom at the same time doesn't help. Sewing this on my new Pfaff Smarter 260c Sewing Machine was lovely, the fabric moved well, the quarter inch guide foot was a dream to use and help me keep to 1/4 inch seams.  Have you got a new sewing machine?  What do you make?  Let me know.


Thursday, 1 January 2015

Mum's Crochet Blanket

I hadn't posted on here for a while or shown pictures of anything I've made recently.  I've been busy working on a crochet blanket for my Mum.  In the summer my Mum had asked me to make her a crochet cushion, I bought some wool and made her this cushion.


I chose colours from my Mum's Curtains in her lounge.  Her curtains are a cream/green/red check.  There is very little red, but the cream is quite yellow and there are a number of different tones of green.   I chose some shades of green, yellow and cream and made this cushion.  I was really pleased with this cushion, the shades of yellow, cream and green were bright and sunny and it was a bright and sunny week when I made the cushion.  I had bought extra wool which I hadn't used in the cushion.  The wool in the cushion and the extra wool I hadn't used went into the blanket.

I made the blanket to go on the back of Mum's Sofa in the lounge to go with the cushion, therefore It wasn't going to be big.  It had different shades of green, yellow, green, cream plus a variegated wool that had shades of pink, purple, green and yellow.  This is the completed blanked/afghan.


It is made from 5 row granny squares using a 4mm crochet hook.  There are two colours per square and each square is made of either 3 rows of colour A and 2 rows of colour B, or 2 rows of colour A, 2 rows of colour B and 1 row of colour A.  4 crochet squares were made from each pair of colour, with the colours alternated around.  This meant no square is the same, each square is different.  To learn how to make a granny square check out this tutorial from Bethintx1 here.  I learnt how to crochet granny squares by following her tutorials on YouTube.

I used a mixture of different types of wool in this blanket.  This is the wool I used.

Patons, Fab, DK, Shade 02344 (the pink/purple/green/yellow variegated wool)

Stylecraft, Wonder Soft Merry Go round, Double Knitting, Shade 3140 - Sunshine
Stylecraft, Special DK, Shade 1263 - Citron
Stylecraft, Special DK, Shade 1114 - Sunshine
Stylecraft, Special DK, Shade 1065 - Meadow

Sirdar Hayfield, Bonus DK, shade 916 - Emerald
Sirdar Hayfield, Bonus DK, shade 957 - Primrose
Sirdar Hayfield, Bonus DK, shade 993 - Aran
Sirdar Hayfield, Bonus DK, shade 882 - Lime

When starting on the squares I started with pairing all colours with the WonderSoft Merry Go Round variegated wool in shades of white, yellow and green.  After this I then paired all the colours with the Patons Fab variegated wool and then all of the colours with the Hayfield Aran wool.  This then made 80 squares allowing me to make an afghan that is 8 squares wide by 10 squares long.  I joined the squared together using double crochet as I find this joins the squares together in a really secure many, especially when the blanket is at the back of the sofa which is used on a daily basis.  I used Hayfield Primrose to join the squares together and complete a layer of double crochet around the edge for the start of the border.

After joining together the squares and completing the foundation stitches for the border I stitched a border using Hayfield Lime, Hayfield Aran and Hayfield Primrose again.  This has two rows of treble crochet (lime and aran) and the final row is a double crochet with a 3 chain in between each stitch make a ripple effect..  As I had initially in the foundation chain stitched 2 stitches in the corner chains for each square and with the ripple effect of the last row, it made a really nice ruffled border to the edge of the blanket.

I was really concerned that the colours wouldn't really work, as the colours looked really bright and garish as I stitched the squares, but once it was all joined together and the border was added the colours worked together really well.  The yellow and green colours were inspired by Mum's curtains and the previous cushion and the pink/purple variegated was such the right colours to represent my Mum that I had to use it and it does work with the other colours, even though there isn't any other pink/purple colours in the blanket.

Anyway let me know what do you think?  Do the colours work?  Does it still look like a blanket made by a beginner crocheter?